In this tutorial, I’m going to show you how I used several floral stock images and Photoshop brushes to compose a fantastic abstract composition. Let's now start creating this cool wallpaper. You all can start exploring different things and images to make such kinds of abstract compositions that looks really cool and amazing. So, lets now start doing our work to make this cool and amazing floral design composition........

Step 1:
First of all, create a new document of 1000x1000px and use a white background.

Step 2:
Make a selection around the violin image. The Easiest way to do this step is by using the Magic Wand tool ( see settings below, make sure you activate the add to Selection button (circled on left) and check the (Contiguous option). Click several times to select all of the background area, which is colored white. Then Inverse the selection (just press Ctrl+Shift+I) and then paste ( Ctr+V ) it to the document we created before.


Step 3:
Open the rose image. Using Polygonal Lasso tool, create selection around the leaf. See image below.

When you’re done with selection, copy and paste leaf image over the violin’s layer in the other document. Clear the white color around the leaf by using Magic Wand tool (just click the white color and then press Delete). Deselect by pressing Ctrl+D.

Drag the leaf layer (Layer 2) below violin’s layer (Layer 1). Using Free Transform command (Ctrl+T), adjust the size and rotate it to right a bit.

Step 4:
Now rename layer 1 to "violin" and layer 2 to "leaf".
Select the violin layer, then press Ctrl+L to bring up the Levels dialog. Adjust Input Levels value as shown below.

Now select the leaf layer, use the Levels command to make increase the leaf’s contrast. Then use Hue/Saturation (Ctrl+ U) command to adjust leaf’s color to make the greens more vibrant, green, and saturated. See image below for details.

Step 5:
Duplicate the leaf layer by pressing Ctrl+J. With the leaf layer copy still selected, adjust the position and rotate it right a bit. See image example below.

Repeat this duplicating process until you get 5 leaf layers. Play around with the size, rotation and position of each leaf layers until you get a very nice layout as shown below.

Step 6:
Click the original leaf layer. Select the Burn tool. Pick a soft round brush and adjust the brush diameter around 30 to 40 px. Reduce the Exposure value to 25%. Now use it to create shadows like shown in this example.

Now we need to make highlights using the Dodge tool. Make sure you pick a soft round brush and reduce the Exposure value to 25% when doing this.

Repeat this process for all of the leaves layer. You should be end with leafs that have much more depth than when we began.

Step 7:
This kind of illustration always ends with a lot of layers, so it’s a better idea to keep these layers organized within layer groups. Below, you can see the simplest way to create a layer group and rename them after.

Now we’re going to balance the composition by duplicated the leaves on the right of the violin to show on the left as well.
Name the layer group duplicate’s: leaf left. With the layer group leaf left still selected, click menu Edit> Transform> Flip Horizontal, all leaf layers should be flipped to the left now. Using the Move tool, drag the layer group leaf left so the leaves are positioned on the violin’s left side.

Step 8:
Duplicate layer group leaf left, rename its duplicate to leaf-FL. Drag layer group leaf-FL over the violin layer.

Re-arrange the leaves using Move tool and Free Transform command. Try to make the leaves’s layout like the one below. Because the leaves are different from before, you should re-define the shadow and highlight area of each leave. Use Dodge and Burn tool to do this.

Duplicate layer group leaf-FL, and then rename the duplicated layer group to leaf-FR . Flip the leaves via menu Edit> Transform> Flip Horizontal. Place these leaves on the bottom right of violin.

Step 9:
Duplicate leaf-FL layer group once more, then rename the duplicated group to leaf-BL. Drag this layer group below layer group leaf right.

Re-arrange the leaves using Move tool and Free Transform command. Arrange the leaves’s layout like the one below. Again, redefine shadows as needed, and duplicate this group so that there are leaves along the back left and back right of the violin.

Step 10:
Open the rose image again. Select the rose petals, using any selection tool you like.
When done selecting, copy and paste the rose image over the leaf-FR layer group. Adjust rose’s size and then place it down with the leaves.

Rename layer 3 (rose’s layer) to rose. Bring up the Levels Dialogue (Ctrl+L), then adjust the input levels value until rose’s color becomes more vibrant as shown below.

Step 11:
For my piece, I’d like to add some flare to the Rose with a drop of blood falling from it. Open the blood image, select it using any selection tool you like. When done, copy-paste it over the rose’s layer.

Rename layer 3 to blood. Now drag it down so it placed below rose’s layer. Adjust the blood’s size and then place it below the rose.

Step 12:
By using Crop tool, make a rectangular selection like this one below. Then adjust the control point so it’s out of the canvas. Press Enter to finish this step (only effective within Photoshop CS above). The canvas should be expanded right now.

Step 13:
Create a new layer below the violin layer. Name the new layer to floral. Load the Suddendly Spring Brushes and make sure you set the brush Opacity back to 100%.
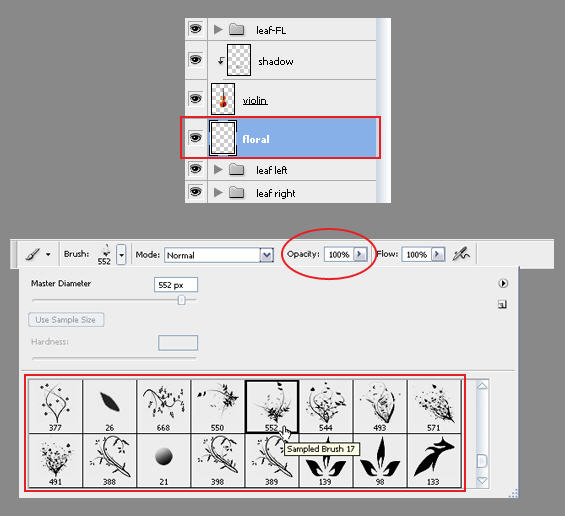
Use these brushes to create some flower shape around the violin. Vary the brush size and shape until you get a nice result.

Step 14:
Create a new layer between the floral and violin layer. Name the new layer to floral color. Set foreground color to red and background color to black. Then use Filter> Render> Clouds to create a red and black cloud..

To put the clouds inside the flowery shape( floral layer ), simply press Alt+Ctrl+G (make sure you still have the floral color layer selected). Now floral color has become a clipping mask, the clouds will now appear inside the floral shapes.

Step 15:
Load the Debris Brush. Then Create a new layer above floral color layer (if the new layer becomes a clipping mask, simply press Alt+Ctrl+G to cancel it). Name the new layer, debris. Use the debris brushes to create some debris around the leaves and violin. For better result, vary the brush size and color so it matches the environment.

Step 16:
Grab the Gradient tool. From the option bar, choose foreground to background color and make sure you activate the linear gradient button. Change the foreground color to #C4DF9C and background color to white. Select the background layer, then use Gradient tool to create the gradient (drag it vertically from bottom to top).

Step 17:
Load the Crushed Paper Brush. Pick (#8dc63f) as the brush color.

Open the Brush Palette by pressing F5. Then open the Brush Tip Shape option. Adjust brush Diameter to 1400px and Change the Angle to 90. Use this brush to create the crushed paper texture (still on the background layer).

Step 18:
Load the Smoke and Ink Brushes. Pick white as the brush color. Now use it to draw some mystic smoke around the violin.

Step 19:
Load the Flower Tattoos Brushes. Pick some of this brush to create an ornament below the violin. You may end up like this example below.

Final Preview:

Comments
Post a Comment